Not much to update*
*This is a lie.
Here it is the middle of February, and there's not much to update. Not much in relation to what I could have done, but there's a fair amount compared to what I had done before.
Actually, there's a fair amount to update; it just doesn't seem like it. That's the nature of these subscription things: you get a few parts that may not be used for a while, and sometimes you save up stuff for a while so it's easier to see the big picture, especially when it comes to painting. And it's almost time for painting the lower hull.
One night, I got to working, and I actually accomplished a fair amount. So, here's the catch-up post.
 Here's the frame complete up until where I had to stop. The missing arc is the starboard side, which is the ramp. Ignore the poinsettia trivet; it is immaterial to the Falcon.
By this time I had finally purchased some blue thread-lock. This will prevent the screws from backing out over time. I definitely don't want to partially disasssemble the Falcon every few months to make sure everything's still snug.
Below is a close-up of the joints so you can see how they fit together. Those screws are tiny. They are driven with a size 0 screwdriver. I've discovered that the screwdriver supplied with the parts is made of not-so-great material. It's getting chewed-up, and it's losing its magentism. A good screwdriver is cheap, though.
 Anyway, the frame is die-cast metal. It's fastened with steel screws and metal brackets. There are also metal ribs running from the center ring to the outside to strengthen the structure.
Hull plating is fashioned from ABS plastic. It has pegs that fit in holes in the framework. Then, self-tapping steel screws are driven in to secure it. Before that, though, I'll light-block each panel by priming the inside with black and then coating in silver for reflectivity. That will keep any light from the interior from spilling out through the skin, as it will be fully opaque. The silver will send the light back into the ship interior.
The cockpit is not fully assembled. I have some levers custom-milled for me from a gentleman in England. I've not had a chance to put them in yet. I need to remove these. "Why remove these?" you may ask. I messed up putting them in, and I'm not happy with them. The new ones are metal, and I should be able to make them look better.
The seats are waiting for me to set up the paint booth so I can airbrush them to their proper color. The pilot and copilot seats are too red, and the navigator seats are too black and white and clean. They need some weathering done to fit in with the Falcon's ... idiom.
I'm quite happy with the way the throttles and yokes turned out. The whole thing should look pretty good when it's complete.
 This is the passage that leads from the cargo hold-slash-living area and goes to the cockpit (at the top) and the turrets (at the bottom). It would lead to the ramp to the right, but it stops before it would reach it. That's not going to be visible when the hull panels are removed.
The floor here, and indeed in all the passages like this, is treated the same way as the cargo hold: I smeared black oil paint all over it, then removed it, leaving the paint in the panel lines. It also makes the floor look somewhat dirty by leaving some of the pigment on and not wiping it off fully.
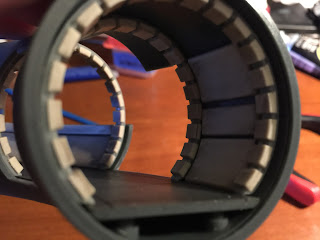
 The rings for the passage. Most people hate these things. They're not too bad, but the pads are very small, and each requires trimming and sanding/filing.
I have a method that I guess is fairly uncommon, as I've never seen anyone else do it. I actually cut as close as I can to the part when removing it from the sprue. Then, I'll use a hobby knife to get the joint shaved down about even to the surface of the part. And only then will I sand the part smooth.
In all, I put eight or nine of these things together.
 Test fitting the rings before fitting the long cushions.
Unlike the ones in the cargo hold, these rings have a peg on top. This serves to keep them properly aligned and upright when the top of the corridor is attached.
As you can see, these rings are not in properly, as the pegs aren't all the same direction. Worry not, though. I fixed it before gluing them in.
 After the test fit, the long cushions get glued in. There are three long cushions in the Falcon's corridors. One at the bottom, one at the top, and one in the middle.
Here you see the one at the bottom, and a small strip above it.
 It might be difficult to see, but on the bottom side--the interior of the ring, if you will--the middle cushion is taller. It's easier to see in this shot, which is really why I took it.
Anyway, the interior will have a top to the corridor. The outside will be viewable by a removable panel after the build is complete. So, the cut out section also cuts through the cushions. You'll be able to see the full cushions on the back walls.
 And here's the top of the corridor. Note the holes for the pegs on the rings. Also note the top cushions.
It's easy to see the cutout for the cockpit passage tube on the bottom side, as well.
 Passage fully assembled. View from ramp end. To the right is the cockpit, and to the left will be the turret passage.
 Again, from the viewable cutout.passage to the turrets on the far side. It's narrower than the one you see in Star Wars. That's because the layout of the interior is based on a refined layout done for Empire Strikes Back. The first movie had an interior that filmed well.
As the story goes, the Falcon was destroyed after Star Wars. it had to be rebuilt, and Lucas commissioned a guy to draw actual deck plans. he noticed that the turrets would need to be farther away from the main passage, and he added a smaller tunnel leading to the ladder.
 View from the port side of the cargo hold. Lighting is bad, but what do you want from a poorly lit room and an iPhone?
 View through cutout and into cargo hold.
 Insert for the port side maintenance access cutout in the hull. These are by the forward landing skids and allow access to the underside for maintenance. Han is looking in the starboard side when the stormtroopers show up in Docking Bay 94.
I'm still working on the paint job for this. I've made it too light, so I need to darken it more, and then I can work on weathering it to make it look rusty and like some lubricants and other fluids have leaked.
 The corridor from the ring to the cockpit. Remember the guy who was hired to draw up the deck plans for the Falcon? Well, considering the placement of the cockpit in relation to the centerline of the main saucer (i.e. above it, rather than inline with it), he realized that there'd have to be a ramp up to the level of the cockpit which didn't appear in Star Wars.
So, the ramp is at the main ring corridor and raises the floor of the passage tube to the level of the cockpit.
 Test fitting of the two passages.
 Same, with a view of the cargo hold.
 Fully assembled turret passage.
 View through turret passage, from main ring corridor. Note how cramped it is. In Star Wars, Han and Luke could basically just step on the ladder from the corridor. The pro knew that the layout of the ship wouldn't allow that, and so this very cramped passage was added to bridge the space between the ring and the turret access ladder.
That's all the updates for now. Next up is finishing the cockpit, assembling the ramp and attaching it to the rest of the framework, then fastening the hull on, followed by the landing gear pods and so on that will then fit on top of all that.
Here it is the middle of February, and there's not much to update. Not much in relation to what I could have done, but there's a fair amount compared to what I had done before.
Actually, there's a fair amount to update; it just doesn't seem like it. That's the nature of these subscription things: you get a few parts that may not be used for a while, and sometimes you save up stuff for a while so it's easier to see the big picture, especially when it comes to painting. And it's almost time for painting the lower hull.
One night, I got to working, and I actually accomplished a fair amount. So, here's the catch-up post.

By this time I had finally purchased some blue thread-lock. This will prevent the screws from backing out over time. I definitely don't want to partially disasssemble the Falcon every few months to make sure everything's still snug.
Below is a close-up of the joints so you can see how they fit together. Those screws are tiny. They are driven with a size 0 screwdriver. I've discovered that the screwdriver supplied with the parts is made of not-so-great material. It's getting chewed-up, and it's losing its magentism. A good screwdriver is cheap, though.

Hull plating is fashioned from ABS plastic. It has pegs that fit in holes in the framework. Then, self-tapping steel screws are driven in to secure it. Before that, though, I'll light-block each panel by priming the inside with black and then coating in silver for reflectivity. That will keep any light from the interior from spilling out through the skin, as it will be fully opaque. The silver will send the light back into the ship interior.
The cockpit is not fully assembled. I have some levers custom-milled for me from a gentleman in England. I've not had a chance to put them in yet. I need to remove these. "Why remove these?" you may ask. I messed up putting them in, and I'm not happy with them. The new ones are metal, and I should be able to make them look better.

The seats are waiting for me to set up the paint booth so I can airbrush them to their proper color. The pilot and copilot seats are too red, and the navigator seats are too black and white and clean. They need some weathering done to fit in with the Falcon's ... idiom.
I'm quite happy with the way the throttles and yokes turned out. The whole thing should look pretty good when it's complete.

The floor here, and indeed in all the passages like this, is treated the same way as the cargo hold: I smeared black oil paint all over it, then removed it, leaving the paint in the panel lines. It also makes the floor look somewhat dirty by leaving some of the pigment on and not wiping it off fully.

I have a method that I guess is fairly uncommon, as I've never seen anyone else do it. I actually cut as close as I can to the part when removing it from the sprue. Then, I'll use a hobby knife to get the joint shaved down about even to the surface of the part. And only then will I sand the part smooth.
In all, I put eight or nine of these things together.

Unlike the ones in the cargo hold, these rings have a peg on top. This serves to keep them properly aligned and upright when the top of the corridor is attached.
As you can see, these rings are not in properly, as the pegs aren't all the same direction. Worry not, though. I fixed it before gluing them in.

Here you see the one at the bottom, and a small strip above it.

Anyway, the interior will have a top to the corridor. The outside will be viewable by a removable panel after the build is complete. So, the cut out section also cuts through the cushions. You'll be able to see the full cushions on the back walls.

It's easy to see the cutout for the cockpit passage tube on the bottom side, as well.


As the story goes, the Falcon was destroyed after Star Wars. it had to be rebuilt, and Lucas commissioned a guy to draw actual deck plans. he noticed that the turrets would need to be farther away from the main passage, and he added a smaller tunnel leading to the ladder.


I'm still working on the paint job for this. I've made it too light, so I need to darken it more, and then I can work on weathering it to make it look rusty and like some lubricants and other fluids have leaked.

So, the ramp is at the main ring corridor and raises the floor of the passage tube to the level of the cockpit.


That's all the updates for now. Next up is finishing the cockpit, assembling the ramp and attaching it to the rest of the framework, then fastening the hull on, followed by the landing gear pods and so on that will then fit on top of all that.
posted by Unknown at 9:43 PM
![]()

0 Comments:
Post a Comment
<< Home